
Blog
how to make flower bouquets
Making a flower bouquet is a fun and creative process! Here’s a step-by-step guide to help you create a beautiful, custom bouquet. Whether it’s for a gift, event, or just for yourself, the process is pretty simple.
What You’ll Need:
-
Fresh flowers: Choose a variety of flowers, including a focal flower (e.g., roses, peonies), filler flowers (e.g., baby’s breath, carnations), and greenery (e.g., eucalyptus, ferns).
-
Floral tape or floral wire: For securing the stems together.
-
Vase (optional, if you want to display it immediately).
-
Scissors or floral shears: To cut the stems.
-
Floral ribbon or twine: For wrapping the bouquet.
-
Floral foam (optional, if you’re arranging the flowers in a vase right away).
Steps to Make a Bouquet:
1. Choose Your Flowers and Greenery
-
Start by picking your main flower or focal flower (this will be the largest or most eye-catching flower).
-
Add in complementary flowers—mix in filler flowers for texture and variety, and greenery for a fresh, natural feel.
2. Prep the Stems
-
Trim the stems of your flowers at an angle, making sure they’re all about the same length for a balanced arrangement.
-
Remove any leaves that would be submerged in water if you’re putting it in a vase (this helps the flowers last longer).
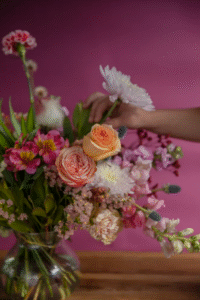
3. Arrange the Flowers
-
Start with the focal flower in the center. Hold it in one hand.
-
Gradually add other flowers around it, working in a circular pattern and alternating between different flower types.
-
Add greenery and fillers between the flowers, arranging them symmetrically or randomly, depending on the look you want.
-
Keep the stems grouped tightly together, and make sure the flowers form a round or oval shape.
4. Secure the Stems
-
Once you’re happy with the arrangement, hold the stems together tightly at the base.
-
Use floral tape or floral wire to secure the stems about 2-3 inches from the bottom.
-
Trim any extra stems to even them out at the base, making sure they’re all about the same length.
5. Wrap the Stems
-
If you’re gifting the bouquet or want a finished look, wrap the stems with ribbon, twine, or burlap. Tie it in a bow or a knot.
-
You can also use floral tape or wire to keep everything tightly bound if you need to.
6. Place in a Vase (Optional)
-
If you want to keep the bouquet fresh right away, place it in water. You can use floral foam at the base of the vase to help hold the flowers in place.
-
If it’s a gift, you can present it with or without the vase.
7. Final Touches
-
You can add a little finishing touch by sprinkling some flower petals or adding small decorative elements (like a piece of ribbon or dried flower sprigs).
-
Give the bouquet a final mist of water if it’s for display, to keep it hydrated.
Tips:
-
Color Scheme: Think about the color palette you want. Classic combinations are white and red, pastel tones, or even wildflower-inspired bouquets with mixed colors.
-
Flower Care: If you’re planning on keeping the bouquet for a while, remember to trim the stems and change the water every couple of days.
-
Arrangement Styles: You can go for a more structured, symmetrical look or something more relaxed and wild, depending on the feel you’re going for.
Do you have a specific theme or style in mind for your bouquet, or are you just experimenting with colors and flowers?
-
: Think about the color palette you want. Classic combinations are white and red, pastel tones, or even wildflower-inspired bouquets with mixed colors.
-
Flower Care: If you’re planning on keeping the bouquet for a while, remember to trim the stems and change the water every couple of days.
-
Arrangement Styles: You can go for a more structured, symmetrical look or something more relaxed and wild, depending on the feel you’re going for.
Do you have a specific theme or style in mind for your bouquet, or are you just experimenting with colors and flowers?
or watch the
Making a flower bouquet is a fun and creative process! Here’s a step-by-step guide to help you create a beautiful, custom